시놀로지 DS220+ NAS (2Gb + 8Gb 추가 = 10Gb)
이전에 글을 올렸을 때는 Docker 를 이용하였는데 이제 Container Manager로 이름이 변경되었다.
Docker 때와 거의 비슷하고 이름만 Container Manager로 변경된 것이다.

약간 우주스러운 아이콘으로 변경되었다. 이제 linuxserver/code-server 를 이용하여 설정을 해보겠다
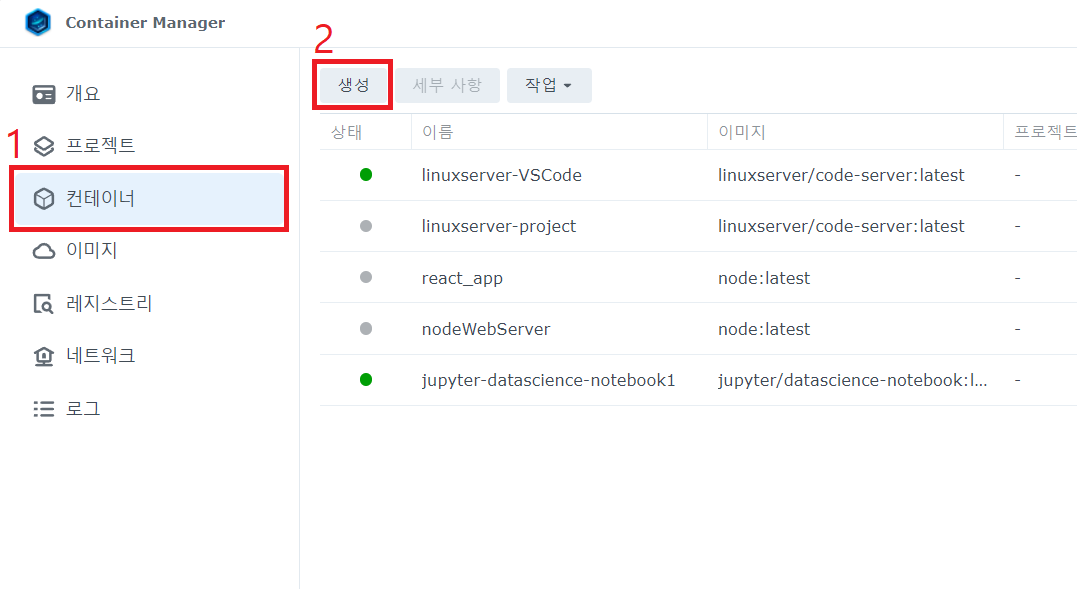
일단 Container Manager를 클릭하여 생성하는 창을 열어주고 컨테이너 → 생성 클릭한다.
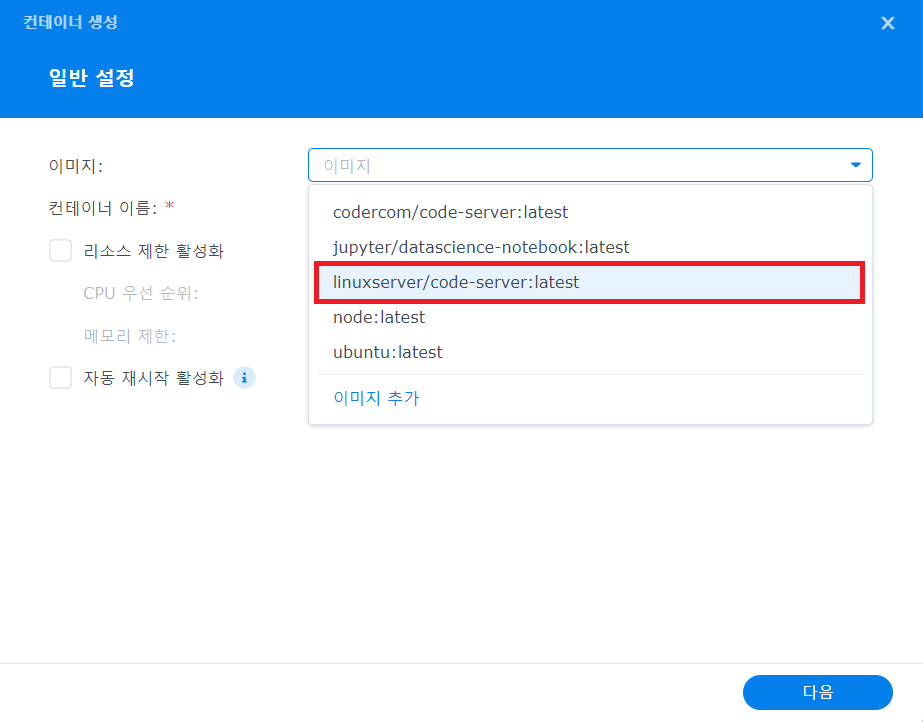
생성을하게 되면 컨테이너 이미지를 선택하게 되어 있다. linuxserver/code-server 를 선택한다.
이전에 이미지를 업데이트 해두는 것이 좋다.
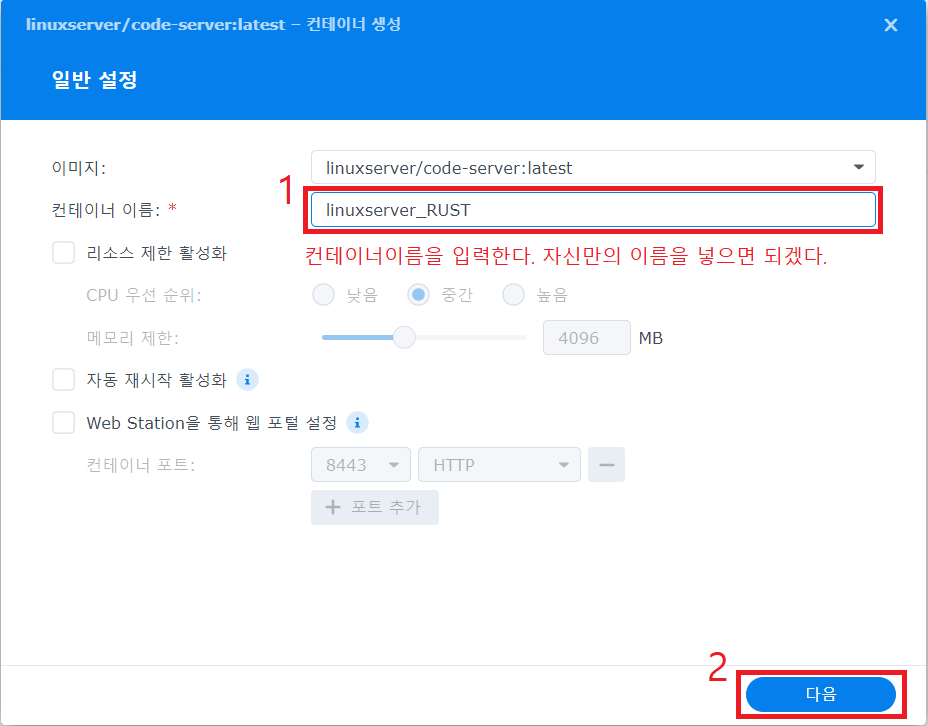
이미지를 선택한 다음 컨테이너 이름을 설정한다. 오늘은 RUST 프로그래밍을 하기 위해서 뒤에 이름을 RUST로 하였다.
다음을 클릭한다.
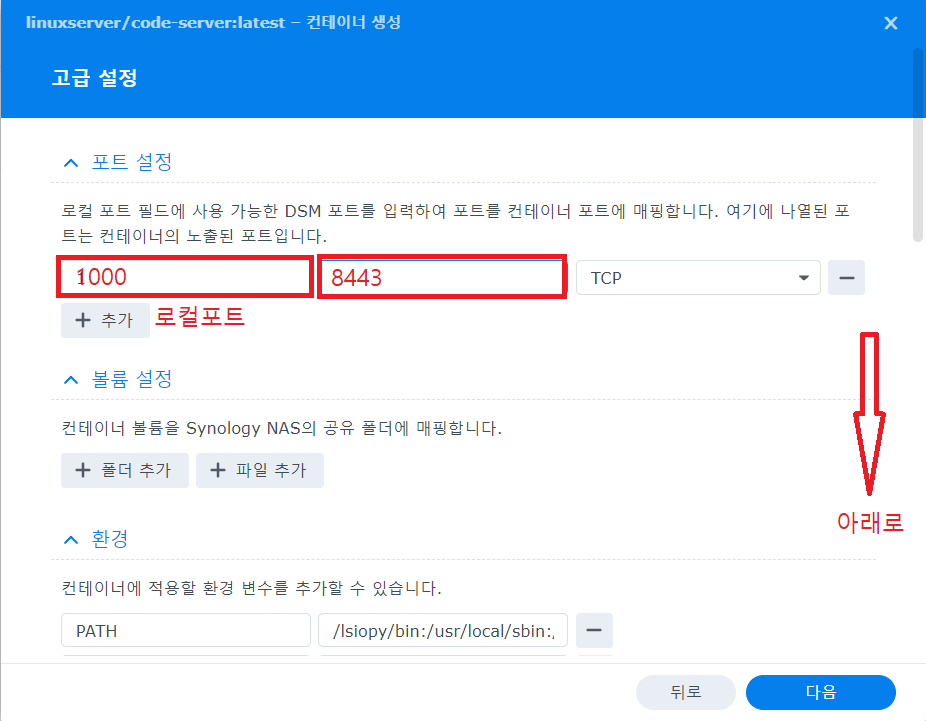
포트 설정에 로컬포트 컨테이너의 포트를 1000 설정하고, 컨테이너 포트를 8443 고정이다.
아 그리고 까먹을 뻔 했다. +폴더추가를 해서 폴더를 설정해준다.
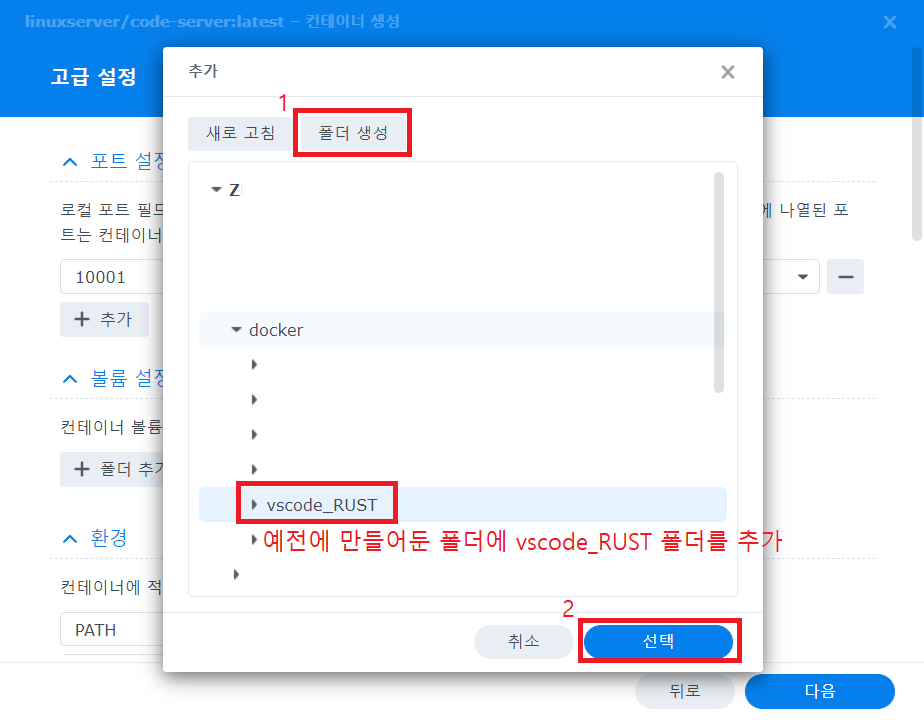
vscode_RUST 폴더를 생성하고 선택한다.
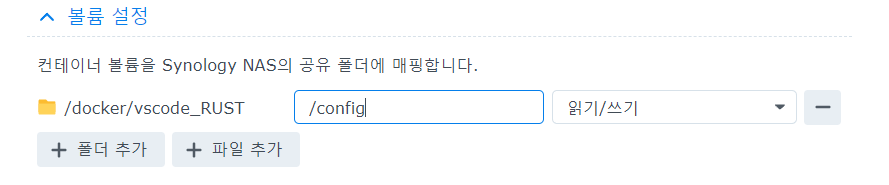
폴더 매칭 폴더를 /config 로 해준다.
스크롤을 아래로 내려서
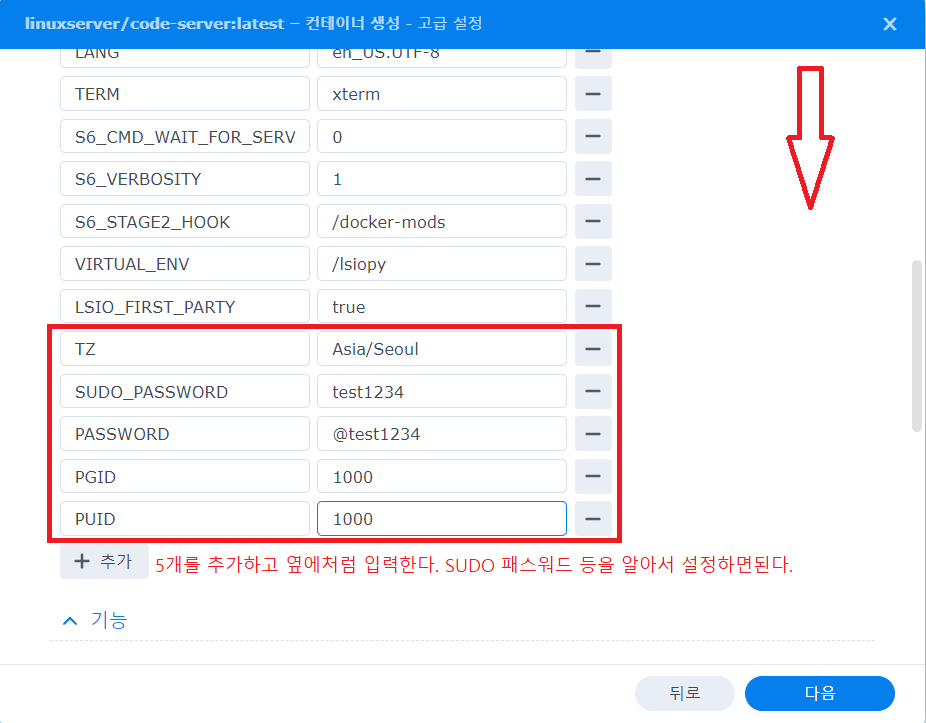
5개 항목을 추가하고 위처럼 작성해준다.
TZ : Asia/Seoul 한국이면 이렇게
SUDO_PASSWORD : 사용자가 설정
PASSWORD : 사용자가 설정
PGID : 권한관련 1000번으로 고정
PUID : 권한관련 1000번으로 고정
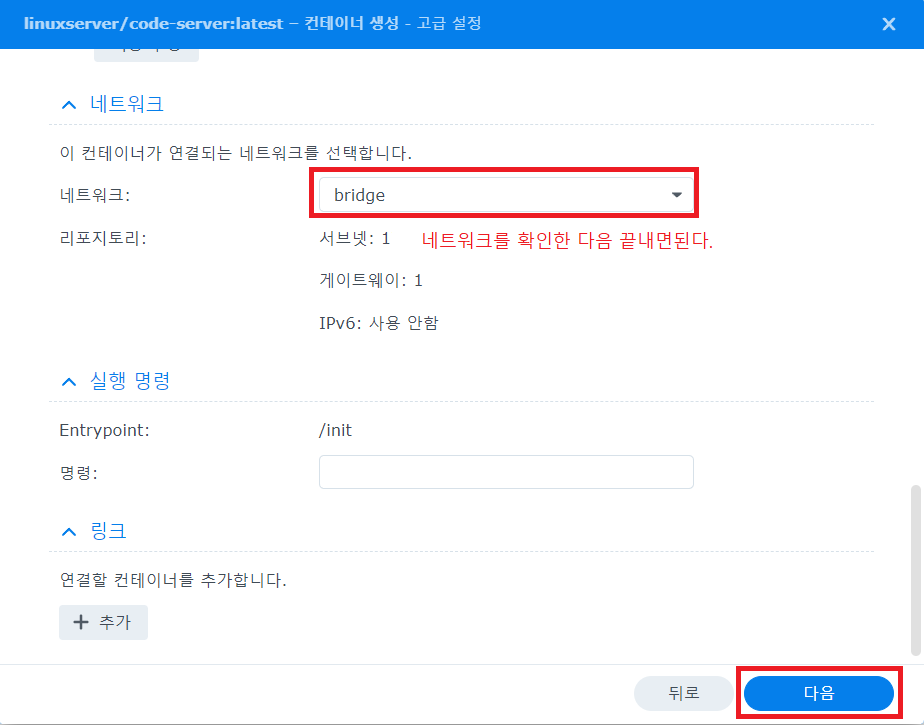
네트워크는 그대로 설정하고 다음 클릭

전체적으로 확인한번하고 완료 한다.

제어판 → 외부액세스 → 생성 클릭하면 외부와의 접속을 설정해주는 창이 만들어진다.

사용자 지정 포트를 선택하고 다음 클릭
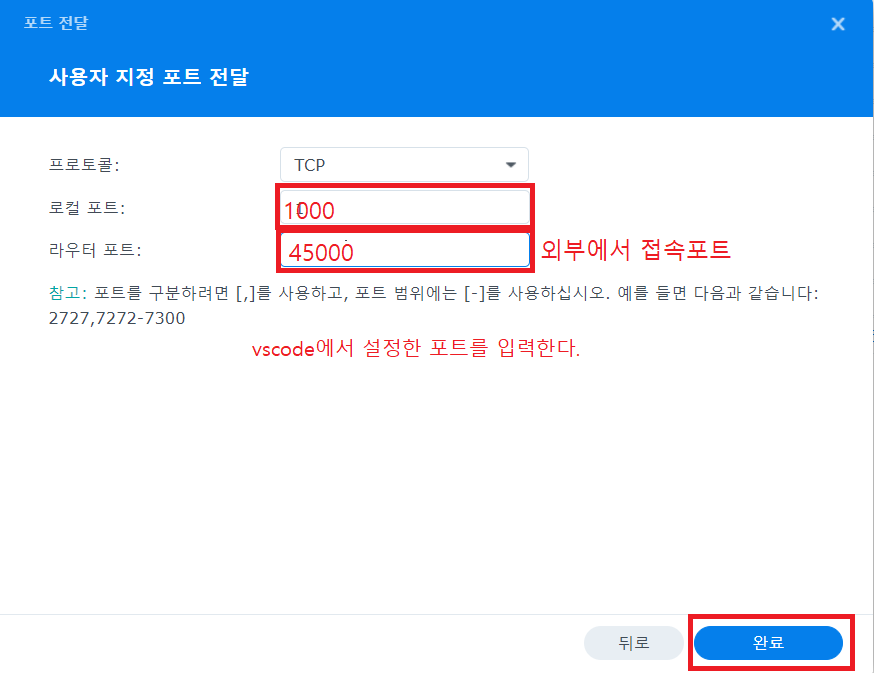
로컬포트는 컨테이너에 설정한 포트 1000번으로 설정
그리고 외부에서 접속할 수 있는 포트는 사용자 자유롭게 설정 (완료)
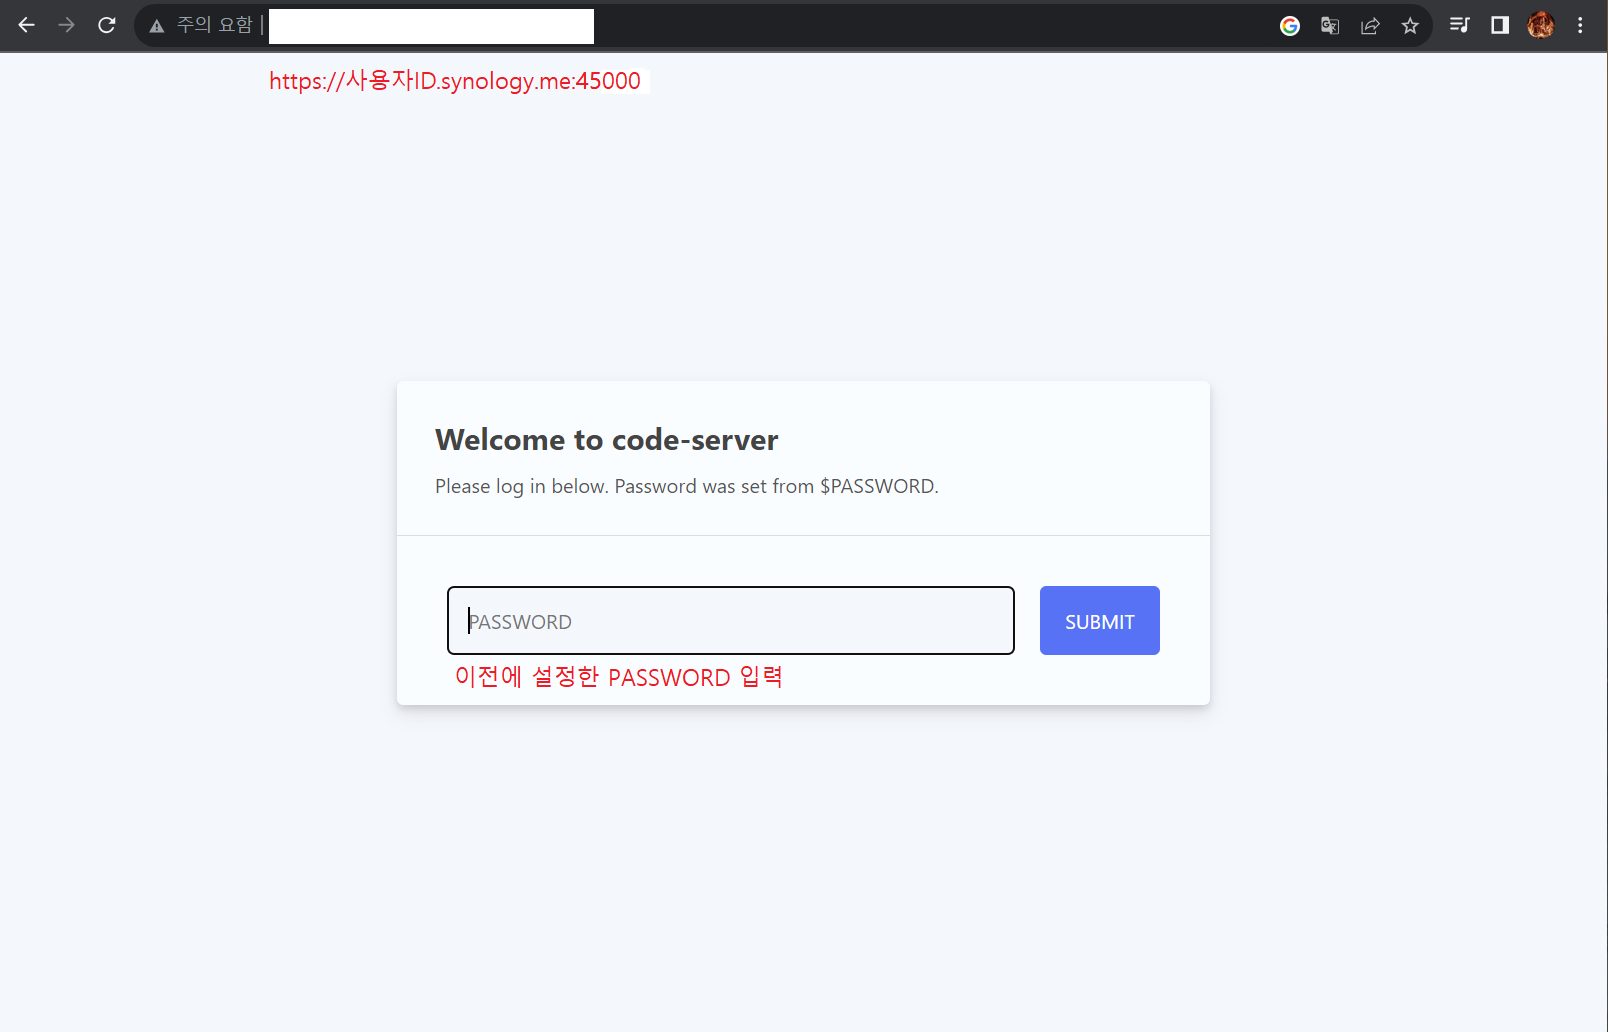
자이제 접속을 해보자 45000 포트로 접속을 하면 위처럼 들어간다. 이전에 설정한 패스워드를 입력하고 들어가자
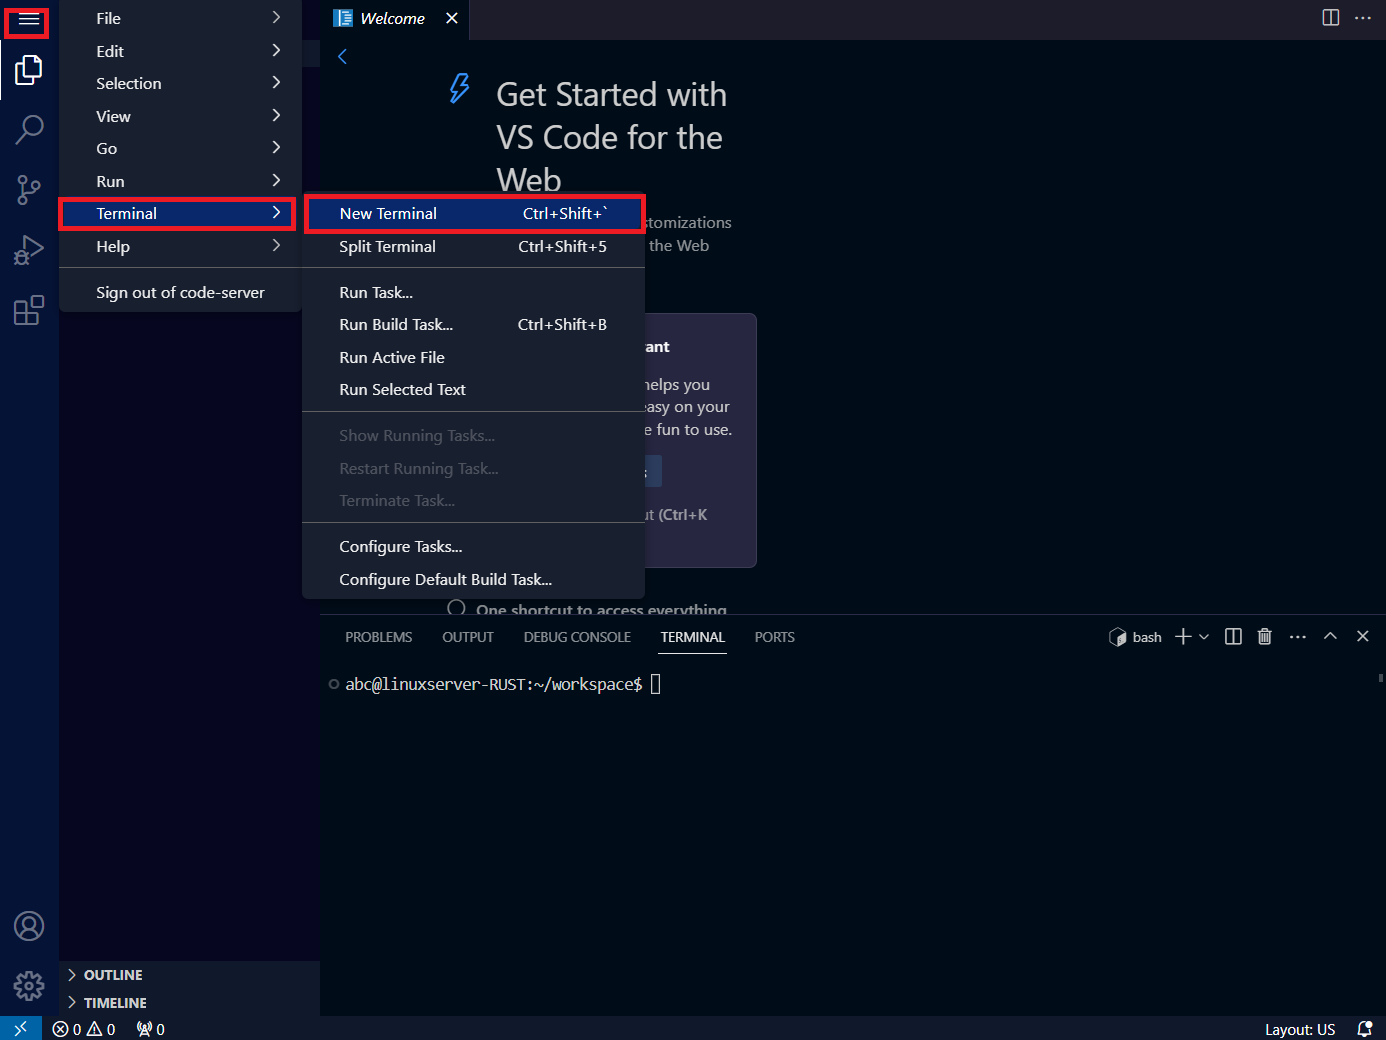
접속을 하게 되면 터미널을 한개 열어서 RUST 언어를 설치 하자
터미널에 아래의 명령어를 입력하고 엔터
curl --proto '=https' --tlsv1.2 -sSf https://sh.rustup.rs | sh
abc@linuxserver-RUST:~/workspace$ curl --proto '=https' --tlsv1.2 -sSf https://sh.rustup.rs | sh
info: downloading installer

Welcome to Rust!

This will download and install the official compiler for the Rust
programming language, and its package manager, Cargo.

Rustup metadata and toolchains will be installed into the Rustup
home directory, located at:

  /config/.rustup

This can be modified with the RUSTUP_HOME environment variable.

The Cargo home directory is located at:

  /config/.cargo

This can be modified with the CARGO_HOME environment variable.

The cargo, rustc, rustup and other commands will be added to
Cargo's bin directory, located at:

  /config/.cargo/bin

This path will then be added to your PATH environment variable by
modifying the profile files located at:

  /config/.profile
  /config/.bashrc

You can uninstall at any time with rustup self uninstall and
these changes will be reverted.

Current installation options:


   default host triple: x86_64-unknown-linux-gnu
     default toolchain: stable (default)
               profile: default
  modify PATH variable: yes

1) Proceed with installation (default)
2) Customize installation
3) Cancel installation
>1
1번을 선택하고 엔터
info: profile set to 'default'
info: default host triple is x86_64-unknown-linux-gnu
info: syncing channel updates for 'stable-x86_64-unknown-linux-gnu'
info: latest update on 2023-08-24, rust version 1.72.0 (5680fa18f 2023-08-23)
info: downloading component 'cargo'
info: downloading component 'clippy'
info: downloading component 'rust-docs'
info: downloading component 'rust-std'
info: downloading component 'rustc'
 63.7 MiB /  63.7 MiB (100 %)  58.9 MiB/s in  1s ETA:  0s
info: downloading component 'rustfmt'
info: installing component 'cargo'
info: installing component 'clippy'
info: installing component 'rust-docs'
 13.7 MiB /  13.7 MiB (100 %)   3.3 MiB/s in  4s ETA:  0s
info: installing component 'rust-std'
 26.8 MiB /  26.8 MiB (100 %)   9.6 MiB/s in  3s ETA:  0s
info: installing component 'rustc'
 63.7 MiB /  63.7 MiB (100 %)  10.9 MiB/s in  7s ETA:  0s
info: installing component 'rustfmt'
info: default toolchain set to 'stable-x86_64-unknown-linux-gnu'

  stable-x86_64-unknown-linux-gnu installed - rustc 1.72.0 (5680fa18f 2023-08-23)


Rust is installed now. Great!

To get started you may need to restart your current shell.
This would reload your PATH environment variable to include
Cargo's bin directory ($HOME/.cargo/bin).

To configure your current shell, run:
source "$HOME/.cargo/env"
RUST 설치가 완료되었다.
abc@linuxserver-RUST:~/workspace$ export PATH="$HOME/.cargo/bin:$PATH"
bin PATH를 설정해줘야지 명령어가 먹힌다.
터미널에서 cargo new hello_world 를 입력하고 엔터를 해보자
abc@linuxserver-RUST:~/workspace$ cargo new hello_world
     Created binary (application) `hello_world` package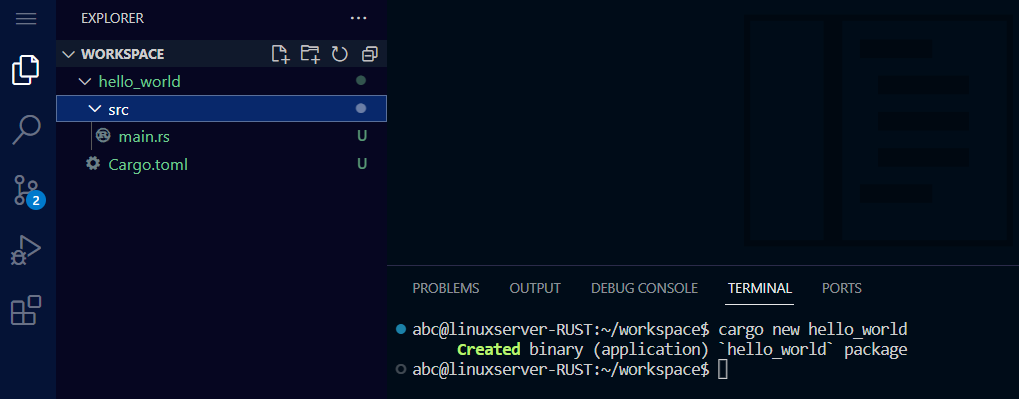
폴더구조를 가진 main.rs가 나타날 것이다.
하지만 cargo run을 하게 되면 아직 컴파일이 안될 것이다.
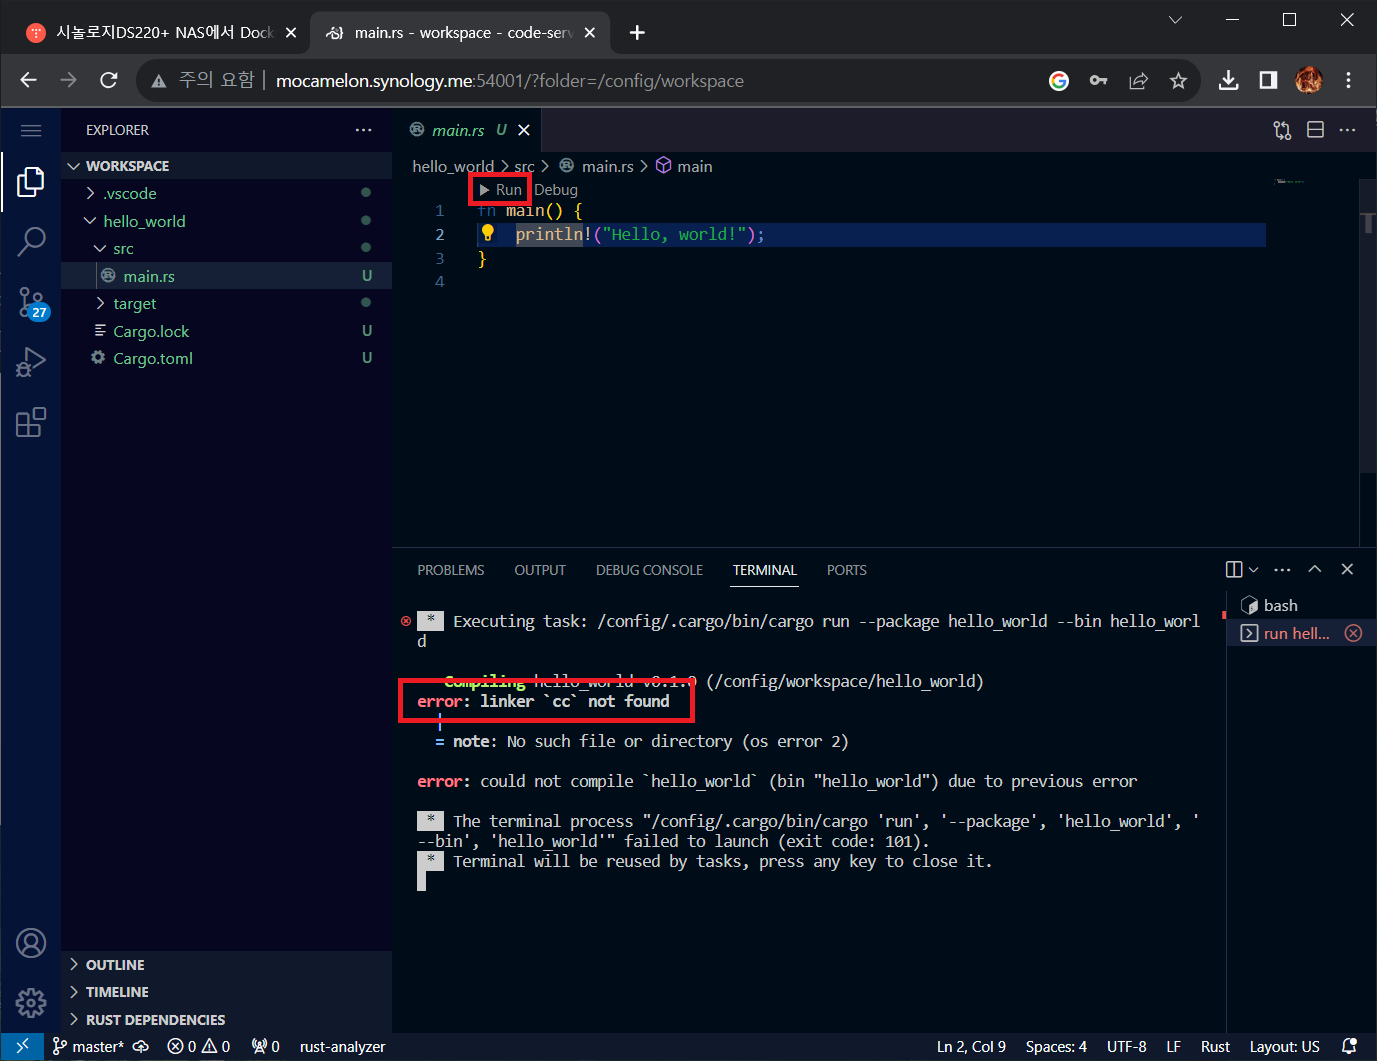
쩝 한참을 구글링해서 -_-) 찾기는 찾았다.
아래처럼 입력해서 apt 업데이트 해주고 build-essential, gcc, cmake 를 설치
차례로 설치해주면된다.
$ sudo apt update
$ sudo apt install build-essential
$ sudo apt install gcc cmake

설치하게 되면 컴파일이 될 것이다.
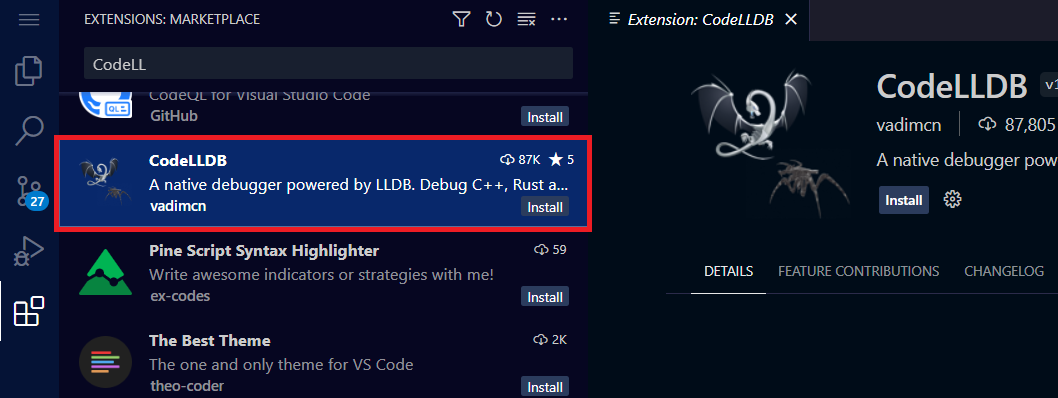
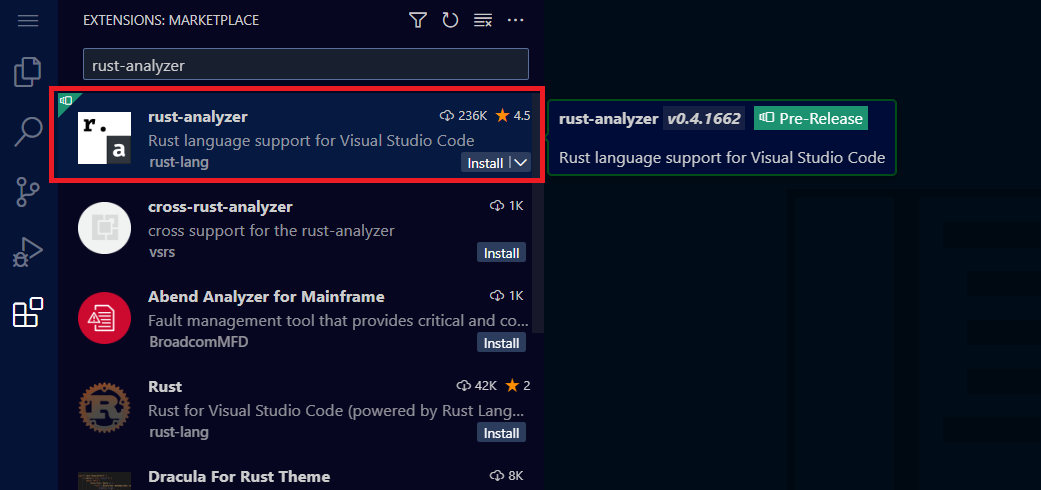
이제 Extensions 를 설치해보겠다. CodeLLDB 하고 , rust-analyzer 를 설치하겠다.
설치하게 되면 아래처럼 디버깅도 가능하다. 이제 웹으로 -_-) 뭐든 코딩할 수 있을 것이다.

오늘은 시놀로지를 이용하여 코딩할 수 있는 환경을 이용하여 IPAD, 갤럭시 등 스마트 패드로 접속해서
코딩을 할 수 있는 방법을 알아 보았다.
장점
언제 어디서나 코딩을 할수 있고, 저장공간 걱정하지 않고 사용이 가능하다.
단점
고용량이나 그래픽을 사용하는 부분은 약간 힘이 들 수 도 있다. GUI로 될 수 있는 방법이 있을 것 같지만 찾아봐야겠다.
다음에는 code-server를 이용하여 Python, C++ 를 설치하는 것을 게시해보겠다.
'44.개발로먹고사는남편하루 > IT생활백서' 카테고리의 다른 글
| 시놀로지DS220+ NAS에서 Docker를 이용한 웹 VSCode설치 (2) | 2022.09.29 |
|---|